Shelley from Varsity Lakes: “I chose Gold Coast Solar Power Solutions because my Mum had solar installed by this company and was happy with her system. I found the whole process to be smooth. The installers were quick, neat and tidy, and professional.”
Image may be NSFW. Clik here to view.
Solar power Varsity Lakes: Shelley’s 5kW Solar Power System at Varsity Lakes – proudly installed by Gold Coast Solar Power Solutions
Gold Coast Solar Power Solutions have been installing solar power systems on the Gold Coast and the surrounding areas since 2008. Our friendly team provides no pressure advice to assist you in determining the best system to meet your specific needs for the Varsity Lakes area. To make things easy for you when you have a system installed, Gold Coast Solar Power Solutions organise the changeover of meters in the Varsity Lakes area with Energex.
We also provide system maintenance checks and solar panel-cleaning, solar power system upgrades and additions, as well as repairs and replacements on solar panels and inverters.
If you are in Varsity Lakes and are after a solar power system, Gold Coast Solar Power Solutions can help you today!
The grid connect solar power inverter is considered to be the “heart” of a solar power system as it controls every aspect of the power generation and provides you with an indication of the systems status and performance data. It’s the first port of call to check that your system is operational and should be checked regularly, if it’s working correctly most inverters will display a green light on constant and show how much power is being generated on the display.
We understand that a solar power system that isn’t working is a liability rather than the asset it should be, we can help you get your solar power system back in operation ASAP.
Many people across Australia are already benefiting from solar panels on their roofs and one thing we are being asked by these people all the time is:
Can I add more solar panels to my solar power system?
And the answer to that question is it depends, maybe.
It would be nice if we could give a one size fits all answer, but whether you can add extra solar panels to your system or not depends on a number of different factors and is not quite as simple as just throwing a few panels on the roof. Lets have a look at the boxes that need to be ticked before we can give the green light to additional solar panels:
Without the first 3 questions being answered we cannot, and I repeat cannot tell you whether you can add additional solar panels or not. Lets look at how you can find the answers to these questions and what your findings will mean.
1. Have you extra unshaded room on the roof for additional panels, facing the correct way?
This one is pretty simple, and the answer is determined by the size of your solar power inverter and the amount of extra solar panels that you want to install. Generally on smaller inverters (2-3kW or below) any additional solar panels will have to go on a roof facing the same aspect as the existing solar panels, and it’s important that this roof is unshaded.
Most people aren’t aware of the fact that solar power systems usually have the solar panels wired in “series”, which means they are all connected in a daisy chain together. The problem with this method is that every solar panel connected in series will work at the power output of the lowest producing solar panel, so it’s very important that each solar panel connected in series is doing the same thing! Hence the important point of having all the solar panels facing the same way and in locations free of any shading. As I said this is a very “general” requirement, we will confirm the requirements with the information gathered from our next questions.
2. How many solar panels do you have & what make and model are they?
Image may be NSFW. Clik here to view.
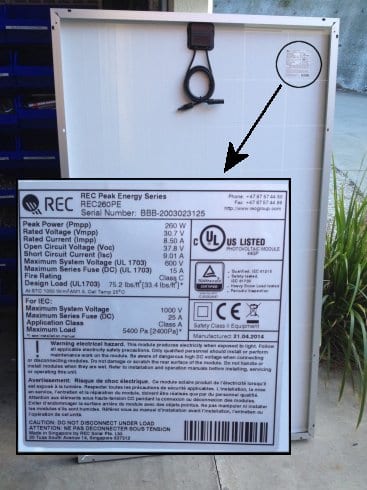
The specifications of a solar panel can usually be found on a data label on the back of the panel like the REC 260W solar panel above. When adding additional solar panels it is extremely important to know the electrical characteristics of your existing panels.
Before we can confirm whether you can install additional solar panels it’s crucial that we know the details of your existing solar panels. The main things we are looking at here are as follows;
1. Brand of solar panel
2. Model of solar panel
3. Power rating of solar panel (in Watts, i.e. 190W or 250W)
4. Open circuit Voltage (Voc) of solar panel
5. Short circuit Current (Isc) of solar panel
Depending on the documentation provided when the original solar panels were installed you may have the first 3 points on file for easy reference. Usually if we have the first 3 points we can quickly work out the last 2 points. If you can’t find this data on file the solar panel information can usually be found on a data label underneath each solar panel. This isn’t the easiest place to access as it requires getting on the roof and underneath a solar panel – we find that taking a photo of the data label with a smart phone held underneath the panel is the easiest method.
The electrical characteristics of the existing solar panels are very important to ensure that we can specify additional solar panels that match the electrical characteristics of the existing. If solar panels with different electrical characteristics are added to your solar power system it can potentially make your solar power system perform worse than it did before!
3. What make and model solar inverter do you have?
Image may be NSFW. Clik here to view.
Aurora 2kW inverter data plate – any additional solar panels connected to this inverter must maintain the system within these parameters.
How many additional solar panels you can add to your solar power system depends greatly on the solar power inverter you have installed. Solar panels can only be added to the inverter if adding the extra solar panels keeps the voltages and current fed to the inverter within the operating window, or working range of the inverter. To ensure that we provide you with the correct information in regards to how many solar panels you can add to the system we need to know the manufacturer and model number of the inverter. From this information we will be able to see what the electrical characteristics of the inverter are and ensure that any additional solar panels meet the inverters criteria.
One thing that a lot of people don’t realise in regards to adding extra solar panels to their system is that the kW rating of your solar inverter doesn’t mean the kW rating of the solar panels is limited to the same. For example a 2kW solar inverter doesn’t mean that you can’t have more than 2kW of solar panels, you can actually claim government rebates on solar panels up to 133% of the inverters rating. That means on a 2kW solar inverter you can claim government rebates on up to 2.66kW of solar panels installed. This is due to the fact that solar panels rarely produce what they are rated at in real world conditions so you can add extra panels to get your solar inverter working at what it’s rated to work at for more of the time.
4. What feed in tariff are you on?
The feed in tariff that your solar power system is connected to is a factor to consider before adding additional solar panels. As every state has different feed in tariffs and different requirements and stipulations it is a bit of a mine field. As it stands in SE QLD and NSW the following are the options;
QLD 44c Feed in Tariff
If you’re connected to this feed in tariff it’s in your best interests to add as many solar panels to your system as your inverter will allow. The more solar panels you have the more power you will produce surplus to your requirements, and you’ll receive the 44c per kWh feed in tariff rate for this extra surplus power. If you’re on this feed in tariff you can add as many solar panels as you like to your existing solar inverter but you cannot install a larger inverter: if you do you will lose the 44c feed in tariff. If you have a small solar inverter and you use heaps of power during the day then losing this feed in tariff may not be a concern; you could put in a larger inverter or an additional system to try and eliminate your day time power consumption. You would lose the feed in tariff but you’re not benefiting from it anyway if you’re already consuming all the solar power you generate. Make the most of the QLD 44c solar power net feed in tariff here
QLD Net Feed in Tariff (Other than the 44c FiT)
If you’re in QLD and on a feed in tariff other than the 44c net feed in tariff that’s no longer available then you can add whatever you like to your system within the limitations of your existing solar panels and inverter. If you want to replace your existing inverter with a larger unit or add an additional solar power system this will require prior approval from Energex before it can be installed. Make the most of the QLD solar power net feed in tariff here
NSW Gross Feed in Tariff
If you’re on the NSW gross feed in tariff you can’t add any additional solar panels to your system; if you do you will lose the feed in tariff. With approval from Essential Energy you can upgrade the inverter to a larger unit but you cannot add extra solar panels to this system. One thing you can do though is install a completely separate, additional solar power system on a net feed in tariff. This would allow you to keep your gross feed in tariff in place, and you certainly don’t want to lose that!
NSW Net Feed in Tariff
On the NSW net feed in tariffs you can add solar panels and upgrade inverters as required with prior approval from Essential Energy.
Add More Solar Panels With The Solar Power Experts
At Gold Coast Solar Power Solutions we carry a large range of quality solar panels and solar inverters in stock that in most cases will work very well with your existing solar power system. By answering the questions above we can very quickly determine if you can add any extra solar panels to your existing system and provide you with a very competitive price to do so. Why not find out how much more you could be saving by adding additional solar panels to your solar power system? Image may be NSFW. Clik here to view.
Image may be NSFW. Clik here to view.Gold Coast Solar Power Solutions are a Service Partner for Fronius solar power inverters. What this means for you if you’re on the Gold Coast and own a Fronius inverter and it develops a fault you can contact us and we should be able to get your solar power system back in action within a couple of days. Gold Coast Solar Power Solutions carry spare parts for Fronius inverters in stock and are trained by Fronius to provide a quick and efficient warranty service, limiting any down time as much as possible. If your inverter is still under warranty the costs will be covered by Fronius. When a Fronius inverter has a fault it usually comes up with a STATE code to explain what’s wrong; the following table lists the Fronius STATE codes so you can get an idea on what your Fronius inverter is trying to tell you and what you can do about it.
Fronius IG Series Inverter STATE codes
Fronius STATE codes beginning with 1xx
Fronius STATE codes beginning with 1 usually only occur temporarily and are caused by the power from the street (the grid) being outside the inverters operating parameters. The Fronius inverter reacts by disconnecting from the grid and attempts to switch on again after the specified mains monitoring period, as long as no further errors occur during this period. The STATE code is displayed whilst the grid is being checked.
Code
Description
Possible causes
Remedy (sequence)
STATE 101
Grid voltage beyond permitted limits
1. Mains voltage error
2. Incorrect values in the service menu
3. Internal fault
1. Check grid voltage, check circuit breakers are ON
2. Change values in the service menu
3. If problem persists contact your Fronius Service Partner
STATE 104
Mains frequency beyond permitted limits
1. Mains frequency error
2. Incorrect values in the service menu
3. Internal fault
1. Check mains frequency, check circuit breakers are ON
2. Change values in the service menu
3. If problem persists contact your Fronius Service Partner
STATE 107
Synchronisation with the public mains supply not possible
1. Mains not connected
2. Incorrect values in the service menu
3. Internal fault
1. Connect mains power, check circuit breakers are ON
2. Check values in the service menu
3. If problem persists contact your Fronius Service Partner
STATE 108
Islanding detected
1. Islanding detected
2. Severe disturbances in public mains
3. Internal fault
1. Automatic correction
2. Automatic correction
3. If problem persists contact your Fronius Service Partner
Fronius STATE codes beginning with 2xx
Fronius STATE codes beginning with 2 are messages from the grid monitoring device (ENS) integrated within the inverter and refer to the parameters of the public mains. Some error checks cross over with the STATE codes beginning with 1, however those in service class 2 are of a higher importance and are displayed for that reason.
Code
Description
Possible causes
Remedy (sequence)
STATE 201
Grid voltage is higher than the specified limit
1. Grid voltage error on the public mains
2. Internal fault
1. Check grid voltage
2. If problem persists contact your Fronius Service Partner
STATE 202
Grid voltage is lower than the specified limit
STATE 203
Grid frequency is higher than the specified limit
1. Grid frequency error on the public mains
2. Internal fault
1. Check grid frequency
2. If problem persists contact your Fronius Service Partner
STATE 204
Grid frequency is lower than the specified limit
STATE 205
Change of public mains impedance
1. Serious disturbances on the public mains
2. Internal fault
1. Reinforce mains cables
2. Connect Fronius IG inverter to another phase
3. If problem persists contact your Fronius Service Partner
STATE 206
Absolute value of the impedence is too high
1. Mains impedence too high
2. Internal fault
STATE 207
Mains relay does not open in spite of switch off signal
Internal fault
If problem persists contact your Fronius Service Partner
STATE 208
Mains relay does not close in spite of switch on signal
Fronius STATE codes beginning with 3xx
Fronius STATE codes beginning with 3 are error states that can occur during grid feed in operation, however they do not indicate damaged electronics and do not lead to a remaining interruption of the feed in operation. After switching off and passing the grid monitoring period, the Fronius IG inverter will start feed in operation again. In case of a temperature excess additional cooling down phase is maintained.
Code
Description
Possible causes
Remedy (sequence)
STATE 301
Safety circuit detects a current peak on the mains supply
1. Voltage drop on the public mains
2. Internal fault
1. Automatic correction
2. If problem persists contact your Fronius Service Partner
STATE 302
Safety circuit detects a current peak on the PV generator side
1. Voltage drop on the public mains supply
2. Internal fault
1. Automatic correction
2. If problem persists contact your Fronius Service Partner
STATE 303
Heat sink temperature on the DC-AC board is too high
1. Ventilation slot congested
2. Very high ambient temperature
3. Distance between inverters too small
4. Internal fault
1. Free ventilation slot
2. Change location of inverter
3. Increase distance between inverters
4. If problem persists contact your Fronius Service Partner
STATE 304
Heat sink temperature on the DC-DC board is too high
STATE 305
Feed-in process not possible, even though public mains parameter within the limits
Internal fault
If problem persists contact your Fronius Service Partner
STATE 306
POWER LOW
Intermediate circuit voltage has dropped below permissable threshold value for feed in
1. Check panels
2. Internal fault
STATE 307
DC LOW
1. DC-input voltage is too low for feed in
2. Internal fault
STATE 308
Intermediate circuit voltage out of the maximum limit
1. Public mains disturbances
2. Internal fault
1. Reinforce mains cable
2. If problem persists contact your Fronius Service Partner
Fronius STATE codes beginning with 4xx
Fronius STATE codes beginning with 4 are error states that require the intervention of a Fronius Service Partner. They are either temporary or lasting and are triggered by faulty hardware or a software problem. Try switching off the Fronius inverter following the system shutdown procedure, leave off for a few minutes then attempt to restart. If the fault continues please contact your local Fronius Service Partner for further assistance.
Code
Description
Possible causes
Remedy (sequence)
STATE 401
Communication error between IG control and the DC-DC board
Internal fault
If problem persists contact your Fronius Service Partner
STATE 402
Write access to the internal Fronius IG memory failed
STATE 403
The area in the internal memory for the country setting is incomplete
STATE 404
Connection between the control unit and the ENS is faulty
1. Public mains not connected
2. Internal fault
1. Check the public mains
2.If problem persists contact your Fronius Service Partner
STATE 405
An old or incorrect version of the ENS microprocessors has been recognised
Internal fault
If problem persists contact your Fronius Service Partner
STATE 406
Temperature sensor on the DC-AC board faulty or not connected
STATE 407
Temperature sensor on the DC-DC board faulty or not connected
STATE 408
Unsymmetry on the public mains detected
1. Public mains disturbances
2. Internal fault
1. Error is remedied automatically
2. If problem persists contact your Fronius Service Partner
STATE 409
Supply of the DC-AC board not available
Internal fault
If problem persists contact your Fronius Service Partner
STATE 410
Service plug on the DC-AC board is not set correctly
STATE 412
Value for fixed voltage is set higher than the open circuit voltage of the PV generator
STATE 413
Open circuit voltage too high in the moment of transformer switching
STATE 414
Memory array for Fronius IG type in EE-PROM faulty
1. One-off – memory error
2. Internal fault
1. Error is remedied automatically
2. If problem persists contact your Fronius Service Partner
STATE 415
No END-enabling signal despite release by IG-control
Internal fault
If problem persists contact your Fronius Service Partner
STATE 416
Communication error between IG-Control and power stack
1. One-off – communication error
2. Internal fault
1. Error is remedied automatically
2. If problem persists contact your Fronius Service Partner
STATE 417
Hardware ID-collision
Internal fault
If problem persists contact your Fronius Service Partner
STATE 419
Two or more power stacks with identical Unique ID
STATE 420
Incomplete number of power stacks detected after reaching online threshold according to device type
STATE 421
Hardware ID sequence error
STATE 425
Receive time-out for data exchange with one or more power stacks exceeded
1. One off error
2. Internal fault
1. Automatic correction
2.If problem persists contact your Fronius Service Partner
STATE 431
All power stacks are in boot mode
Internal fault
If problem persists contact your Fronius Service Partner
STATE 432
Consistent error in power stack management
1. One off error
2. Internal fault
1. Automatic correction
2.If problem persists contact your Fronius Service Partner
STATE 433
Allocation error of dynamic addresses
STATE 434
Ground fault detected
STATE 435
Wrong configuration for EE-Prom
STATE 436
Error transmission faulty
STATE 437
Power stack work around is active
STATE 438
Error during state code transmission
1. One-off error
2. Permanent error
1. Automatic correction
2.If problem persists contact your Fronius Service Partner
STATE 441
Power rack fan faulty
Internal fault
If problem persists contact your Fronius Service Partner
STATE 442
Master for one phase could not be assigned
1. Temporary communication error
2. Internal fault
1. Error is remedied automatically
2. If problem persists contact your Fronius Service Partner
STATE 443
DC-DC energy transfer failure
1. Error during switching on a power stack
2. Internal fault
1. Error is remedied automatically
2. If problem persists contact your Fronius Service Partner
STATE 444
AC monitoring self test interrupted
During the self test another error occured
Quit the self test by pressing ESC and remedy the failure according to the error code list
Fronius STATE codes beginning with 5xx
Fronius STATE codes beginning with 5 generally do not stop the feed in operation of the Fronius IG inverter. The STATE codes will be displayed until the message is acknowledged by pushing a button on the display (the inverter will work in feed in operation during this time).
Code
Description
Possible causes
Remedy (sequence)
STATE 501
Heat sink temperature too high, although Fronius IG is on low output
1. Ventilation slot congested
2. Internal fault
1. Free ventilation slot
2.If problem persists contact your Fronius Service Partner
STATE 502
An isolation fault between DC+ or DC- to earth has been detected
Isolation fault at the solar generator
Check cables and solar generator
STATE 504
An error occured while scanning LocalNet addresses
Identical Fronius IG address used twice
Check address of the inverters and other components
STATE 505
The area in the internal memory for the “Setup” values is incomplete
1. One off error
2. Internal fault
1. Automatic correction
2.If problem persists contact your Fronius Service Partner
STATE 506
The area in the internal memory for the “Total” values is incomplete
STATE 507
The area in the internal memory for the “Day/Year” values is incomplete
STATE 508
The area in the internal memory for the “WR number” is damaged
STATE 509
No feed in operation for 24 hours
1. Snow covered or very dirty solar panels
2. Insufficient power from the solar panels for feed in operation
3.Internal error
1. Clean solar panels or remove snow
2. If problem persists contact your Fronius Service Partner
STATE 510
Errors detected by LocalNet self diagnostic system
1. One-off memory error
2. Internal fault
1. Automatic correction
2. If problem persists contact your Fronius Service Partner
STATE 511
Errors detected by LocalNet Sensor Card self diagnostic system
STATE 512
According to the device type too many power stacks have been detected
1. One-off error
2. Internal fault
STATE 513
Power stacks in boot mode
STATE 514
Incomplete number of power stacks detected after reaching online threshold – Device type
STATE 515
One or more power stacks notified STATE 406/ 407/ 409/ 410
Internal fault
If problem persists contact your Fronius Service Partner
STATE 516
One power stack exceeds the permitted limit of error messages per day (>50x)
STATE 517
Permanent POWER LOW or DC LOW error
Image may be NSFW. Clik here to view.Fronius is an Austrian manufacturer of solar inverters and are well known for their quality and fast response to warranty claims. If you are on the Gold Coast or South Brisbane and your Fronius IG inverter is giving you problems then contact us here or give us a call on 07 55 228 980 – we are here to help ensure that your solar power system remains an asset rather than a liability!
Fran from Nerang: “I chose Gold Coast Solar Power Solutions for my solar install on the recommendation of a friend and because of the price. The process was smooth and they gave clear explanations on everything. The installers got on with the job and they kept me informed on what was happening.”
Image may be NSFW. Clik here to view.
Solar power Nerang: Fran’s 3kW Solar Power System at Nerang – proudly installed by Gold Coast Solar Power Solutions
Gold Coast Solar Power Solutions have been installing solar power systems on the Gold Coast and the surrounding areas since 2008. Our friendly team provides no pressure advice to assist you in determining the best system to meet your specific needs for the Nerang area. To make things easy for you when you have a system installed, Gold Coast Solar Power Solutions organise the changeover of meters in the Nerang area with Energex.
We also provide system maintenance checks and solar panel-cleaning, solar power system upgrades and additions, as well as repairs and replacements on solar panels and inverters.
If you are in Varsity Lakes and are after a solar power system, Gold Coast Solar Power Solutions can help you today!
Image may be NSFW. Clik here to view.As a Fronius service partner we’ve seen a number of Fronius IG series inverters with STATE 104 errors. Fronius describe this as “Grid frequency in all phases beyond permitted limits” and list the following as possible causes:
Grid frequency error
Values in the service menu
The STATE 104 code is usually referring to an issue with the power from the electricity grid being outside the pre-defined limits of the Fronius inverter. With that being the case the first thing to do is check the following:
1. Check that there is not blackout – do you have power elsewhere?
2. Locate the Solar Supply Main Switch in your switchboard and ensure it is in the ON position
3. Locate the AC Output Isolator (if present it will be beside the inverter, your system may not have one) and ensure it is ON
4. If any of the above were off then turn it back on and check your inverter and see if it’s restarting. This process will usually take a couple of minutes
If after checking the above and still the STATE 104 code hasn’t cleared it is worth trying one last thing and that’s a reboot of the system. To ensure that it isn’t just a one off error the best thing to do is try to reboot the inverter. To reboot your Fronius inverter follow the system shutdown procedure which should be near your inverter or possibly in your switchboard. Normally the shutdown procedure will be as follows:
1. Locate the Solar Supply Main Switch in your switchboard and switch it OFF
2. Locate the PV ARRAY MAIN SWITCH / SOLAR DC ISOLATOR (usually right beside the inverter) and switch it OFF
The inverter will turn off after a few seconds, wait 30 seconds or so and turn the system back on by turning the switches you just turned off back ON; the order in which you turn them on isn’t important.The inverter will attempt to start up, if after a few minutes the system is back in operation well done! If it’s still coming up with a STATE 104 error or another fault code then it looks like you are going to need professional help.
How to get a STATE 104 error fixed
Image may be NSFW. Clik here to view.If your Fronius inverter is still within the warranty period or even if your not sure (a 5 year warranty is standard) then you can call Fronius directly on 03 8340 2910 or if you’re on the Gold Coast or South Brisbane you can contact us here. Either way we will require your inverters serial number which can be found underneath the inverter. It will be 8 digits followed by a / and 2 more digits, such as 12345678/20. If your inverter is out of the warranty you have 2 options:
1. Pay to get it fixed (and still have no warranty)
2. Install a quality replacement inverter with a full new warranty.
Either way if you’re on the Gold Coast or South Brisbane then we can help, just contact us here or if you are somewhere else please call Fronius on 03 8340 2910. The Fronius guys in Melbourne are a great help and will be able to point you in the right direction. Click here for a full list of Fronius IG inverter STATE codes
Image may be NSFW. Clik here to view.As a Fronius service partner we’ve seen a number of Fronius IG series inverters with POWER LOW errors. Fronius describe this as “Intermediate circuit voltage has dropped below permissible threshold value for feed in”.
The POWER LOW code is usually referring to an issue with the power from the solar panels being too low for the Fronius inverter to operate correctly. With that being the case the first thing to do is check that the sun is shining! If it’s early in the morning or late in the afternoon and there isn’t much light around then just hang on, wait for the sun to come out and then check to see if your inverter is working properly now. Another potential problem may be shading on the solar panels – take a quick look and make sure there is no shading on ANY of the solar panels.
If after checking the above the POWER LOW code still hasn’t cleared it’s worth trying a reboot of the system. To reboot your Fronius inverter follow the system shutdown procedure which should be near your inverter or possibly in your switchboard. Normally the shutdown procedure will be as follows:
1. Locate the Solar Supply Main Switch in your switchboard and switch it OFF
2. Locate the PV ARRAY MAIN SWITCH / SOLAR DC ISOLATOR (usually right beside the inverter) and switch it OFF
The inverter will turn off after a few seconds, wait 30 seconds or so and turn the system back on by turning the switches you just turned off back ON; the order in which you turn them on isn’t important.The inverter will attempt to start up, if after a few minutes the system is back in operation well done! If it’s still coming up with the POWER LOW error or another fault code then it looks like you are going to need professional help.
How to get a POWER LOW error fixed
Image may be NSFW. Clik here to view.If your Fronius inverter is still within the warranty period or even if your not sure (a 5 year warranty is standard) then you can call Fronius directly on 03 8340 2910 or if you’re on the Gold Coast or South Brisbane you can contact us here. Either way we will require your inverters serial number which can be found underneath the inverter. It will be 8 digits followed by a / and 2 more digits, such as 12345678/20. If your inverter is out of the warranty you have 2 options:
1. Pay to get it fixed (and still have no warranty)
2. Install a quality replacement inverter with a full new warranty.
Either way if you’re on the Gold Coast or South Brisbane then we can help, just contact us here or if you are somewhere else please call Fronius on 03 8340 2910. The Fronius guys in Melbourne are a great help and will be able to point you in the right direction. Click here for a full list of Fronius IG inverter STATE codes
Have you just walked past your Sharp JH1600 solar inverter and been greeted with a D-21 fault on the screen? Image may be NSFW. Clik here to view.
Unfortunately the D-21 error is a major internal fault with the inverter and the official response to from Sharp is: “the D-21 fault is caused by excessive voltage transients on the input or output of the inverter. It is highly likely that an external factor such as Lightning or Power surge on the Grid is the root cause of this issue. These type of faults may be covered by Domestic Home Insurance.”
So you can pretty much read into this that it’s a fault that Sharp will not cover under warranty, unless your Sharp JH1600 inverter was installed by Origin as they may do something about it although I wish you luck with getting anything to happen quickly with Origin!
If your Sharp JH1600 inverter was installed by someone other than Origin or you have given up on receiving decent service from Origin the best thing to do is replace the faulty inverter with a quality 1.5kW or 1.6kW solar power inverter. We recommend the SMA SB1600TL as a nearly bulletproof replacement unit perfectly sized to replace the Sharp JH1600.
As also mentioned in Sharp’s response the D-21 fault code is usually caused by lightning or a power surge from the power grid. If you are on the Gold Coast or Brisbane Gold Coast Solar Power Solutions can certainly help you get your solar power system fully operational again ASAP, why not contact us now to get the ball rolling?
Have you just walked past your Sharp JH1600 solar inverter and been greeted with a D-27 fault on the screen? Image may be NSFW. Clik here to view.
Unfortunately the D-27 error is a major internal fault with the inverter and the official response to from Sharp is: “the D-27 fault is caused by excessive voltage transients on the input or output of the inverter. It is highly likely that an external factor such as Lightning or Power surge on the Grid is the root cause of this issue. These type of faults may be covered by Domestic Home Insurance.”
So you can pretty much read into this that it’s a fault that Sharp will not cover under warranty, unless your Sharp JH1600 inverter was installed by Origin as they may do something about it although I wish you luck with getting anything to happen quickly with Origin!
If your Sharp JH1600 inverter was installed by someone other than Origin or you have given up on receiving decent service from Origin the best thing to do is replace the faulty inverter with a quality 1.5kW or 1.6kW solar power inverter. We recommend the SMA SB1600TL as a nearly bulletproof replacement unit perfectly sized to replace the Sharp JH1600.
As also mentioned in Sharp’s response the D-27 fault code is usually caused by lightning or a power surge from the power grid. If you are on the Gold Coast or Brisbane Gold Coast Solar Power Solutions can certainly help you get your solar power system fully operational again ASAP, why not contact us now to get the ball rolling?
Anne from Bogangar: “I chose Gold Coast Solar Power Solutions because Russell was professional, personable and sounded honest and reliable. Also it is a local, family-owned business. Nathan, the installer, and his team, provided professional and friendly service. They were very respectful in other people’s homes. Overall it was great prompt service with professional staff and the after installation service was also great.”
Image may be NSFW. Clik here to view.
Solar power Bogangar: Anne’s 2.5kW Solar Power System at Bogangar – proudly installed by Gold Coast Solar Power Solutions
Gold Coast Solar Power Solutions have been installing solar power systems on the Gold Coast and the surrounding areas since 2008. Our friendly team provides no pressure advice to assist you in determining the best system to meet your specific needs for the Bogangar area. If you require Gold Coast Solar Power Solutions to organise the changeover of meters in the Bogangar area with a Level 2 Electrician, please let us know when scheduling your installation.
We also provide system maintenance checks and solar panel-cleaning, solar power system upgrades and additions, as well as repairs and replacements on solar panels and inverters.
If you are in Bogangar and are after a solar power system, Gold Coast Solar Power Solutions can help you today!
Phil from Reedy Creek: “I chose Gold Coast Solar Power Solutions for my solar installation because Russell gave a good impression. He was interested in the customer and not sales. I was very happy with the service and good quality products. I appreciate that they went to the trouble to follow up after the installation. The process was quick and Nathan Nathan explained how to use everything once he had installed it.”
Image may be NSFW. Clik here to view.
Solar power Reedy Creek: Phil’s 5kW Solar Power System at Reedy Creek – proudly installed by Gold Coast Solar Power Solutions
Gold Coast Solar Power Solutions have been installing solar power systems on the Gold Coast and the surrounding areas since 2008. Our friendly team provides no pressure advice to assist you in determining the best system to meet your specific needs for the Reedy Creek area. To make things easy for you when you have a system installed, Gold Coast Solar Power Solutions organise the changeover of meters in the Reedy Creek area with Energex.
We also provide system maintenance checks and solar panel-cleaning, solar power system upgrades and additions, as well as repairs and replacements on solar panels and inverters.
If you are in Reedy Creek and are after a solar power system, Gold Coast Solar Power Solutions can help you today!
Bob and Deborah from Elanora: “I chose Gold Coast Solar Power Solutions for my solar installation because they are a local company, with the gear I wanted and Russell was looking to meet my needs as the customer. They did a good professional job and were helpful. It’s already cutting the bill!”
Image may be NSFW. Clik here to view.
Solar power Elanora: Bob and Deborah’s 5kW Solar Power System at Elanora – proudly installed by Gold Coast Solar Power Solutions
Gold Coast Solar Power Solutions have been installing solar power systems on the Gold Coast and the surrounding areas since 2008. Our friendly team provides no pressure advice to assist you in determining the best system to meet your specific needs for the Elanora area. To make things easy for you when you have a system installed, Gold Coast Solar Power Solutions organise the changeover of meters in the Elanora area with Energex.
We also provide system maintenance checks and solar panel-cleaning, solar power system upgrades and additions, as well as repairs and replacements on solar panels and inverters.
If you are in Elanora and are after a solar power system, Gold Coast Solar Power Solutions can help you today!
Dominic from Mermaid Waters: “A friend told me about Gold Coast Solar Power Solutions and I found them quite reasonable on price when I was comparing them with other companies I had already looked at. The installation was quick and smooth, and the workers were pleasant.”
Image may be NSFW. Clik here to view.
Solar power Mermaid Waters: Dominic’s 6kW Solar Power System at Mermaid Waters – proudly installed by Gold Coast Solar Power Solutions
Gold Coast Solar Power Solutions have been installing solar power systems on the Gold Coast and the surrounding areas since 2008. Our friendly team provides no pressure advice to assist you in determining the best system to meet your specific needs for the Mermaid Waters area. To make things easy for you when you have a system installed, Gold Coast Solar Power Solutions organise the changeover of meters in the Mermaid Waters area with Energex.
We also provide system maintenance checks and solar panel-cleaning, solar power system upgrades and additions, as well as repairs and replacements on solar panels and inverters.
If you are in Mermaid Waters and are after a solar power system, Gold Coast Solar Power Solutions can help you today!
Do you have a 1kW solar inverter that has failed and it’s out of the original manufacturers warranty? The best thing to do will be to replace the faulty inverter with a brand new model with a full warranty, but you have to be careful that you install a replacement solar inverter that will keep you eligible for the current feed in tariff that you have been enjoying. What I mean for example is if you’re in QLD and have been enjoying the 44c net feed in tariff you cannot replace your 1kW solar inverter with a larger sized inverter; if you do replace it with a larger inverter you will lose your 44c feed in tariff and will get paid 0c for any surplus solar power, or 6c if you have your power bills with Origin or 8c if you are with AGL.
Image may be NSFW. Clik here to view.
As this is the case obviously the best thing to do is replace your faulty 1kW solar inverter with another quality 1kW solar inverter.
The SMA Sunny Boy SB 1100 is the perfect grid connect inverter for a 1 KW solar installation and is one of the most efficient on the market. The SB1100 1kW solar inverter features an LCD display which by simply tapping turns on to show you your solar power systems current power output amongst other vital details about your solar power system. These 1kW solar inverters come with a 5-year warranty as standard through SMA, the manufacturer. SMA SB1100 inverters are designed and manufactured in Germany and are a very reliable solar inverter.
SMA Sunny Boy SB1100 Solar Grid Connect Inverter
The SB1100 is one of the most high quality solar inverters on the market. Featuring SMA’s famous German engineering, the inverter will help to achieve the optimum match between the solar panels output power and the inverters input power.
The SB1100 has an extended input voltage range of 400V, meaning that the inverter allows the implementation of a multitude of module configurations.
Features:
Integrated DC load-disconnecting switch ESS
For indoor and outdoor installation
Extended temperature range
Specifications:
Model: SB1100
Nominal Output: 1000W
Max. Power Output: 1100W
Max. Efficiency: 93%
Max Input Current: 10A
Max Input Voltage: 400V
Solar Voltage Range, MPPT: 139-400V
Dimensions (L x W x H): 434mm x 295mm x 214mm
Weight: 22kg (SN:SB1100)
Buy an SMA SB1100 1kW Solar Inverter With 10 Year Warranty
Gold Coast Solar Power Solutions have a limited number of SMA Sunnyboy SB1100 solar inverters in stock ready for purchase, these are units with a green BP front instead of the standard distinctive SMA red front. These 1kW solar inverters come with a 10 year warranty from the date of installation. Why not buy one today?
Recently we have had a number of customers here on the Gold Coast approach us about reactive power and solar power systems. It sounds like some unscrupulous sales people on the Gold Coast and Brisbane are trying to use Energex’s changes in regards to reactive power and solar power inverters to add some fear into their sales pitches. Let’s have a look at what’s going on and try to separate the fact from the fiction.
New Energex Rules with Reactive Power and Solar Inverters
From the 1st of October 2015 Energex will be bringing in a ruling that makes it mandatory that every solar power inverter greater than 3kW in size requires reactive power control set to 0.9 lagging. This change has been made to reduce the probability of over-voltages occurring on the electricity network and will reduce nuisance tripping of the solar power inverters as well as reducing any interference to other customers in the local area.
What Does 0.9 Lagging Reactive Power Mean?
Image may be NSFW. Clik here to view.
Reactive Power and Solar Power demonstrated in a chip packet, the chip packet is a certain volume but how much is actually used?
This is where it starts to get a little complicated, so grab your thinking cap and hold on!
Have you ever heard of kVA, Power Factor and kW? kVA (kilovolt-ampere), Apparent Power is a unit of electric power equal to 1000 volt amps. This is calculated by Voltage x Amps. So a 5 kVA solar inverter at full power output would be working at 240V x 20.83A, that equals 5000VA, or 5kVA. Power Factor (pf) is a ratio (a number from 0 to 1) of true, or real power and apparent power. In the case of a 1.0 power factor (also called unity power factor), the real power equals the apparent power. In the case of a 0.5 power factor, real power is approximately half that of the apparent power. kW (kiloWatt), True Power or Real Power is a unit of electric power equal to 1000 Watts. In the past it has normally been used to list the power rating of the solar inverters, and is still accurate to be used to list the power rating of solar panels, but with a Power Factor of anything other than 1 it is no longer an accurate measure to use for solar inverters. kW are calculated by Voltage x Amps x Power Factor, so a 5kW rated solar inverter set to the new Energex requirements of a lagging power factor of 0.9 would equal the following: 240V x 20.83A x 0.9pf = 4500W, or 4.5kW, but the inverter still has a 5kVA rating!
What all this means at the end of the day is that from October 2015 any new solar power system with a solar inverter larger than 3kVA will have to be set to have a reactive power rating of 0.9 lagging, and as all current residential electricity meters only measure kW not kVA this means that when a 5kVA inverter is producing 5kVA of power then 500 watts of generated solar power will be of no benefit, it will be lost due to the lagging power factor.
With Reactive Power Is It Still Worth Going Solar?
As can be seen above a lagging reactive power factor of 0.9 could potentially waste 500W from a 5kVA inverter at peak power production. Obviously we would all prefer to have losses kept to a bare minimum and a potential 10% loss due to a 0.9 reactive power setting seems huge, but is it actually as bad as all that?
Lets have a look:
A solar power system will very rarely produce the amount of power it is rated to produce due to various losses so it would be only for very short periods where the solar power system is actually losing 500W of power. Usually the losses would be a lot lower than 500W, however it is still a 10% loss.
Even with the losses from the reactive power factor setting savings from a solar power system will still provide a great benefit.
If a solar power system has the solar panel array split over 2 or more different roof aspects (say half facing East, half facing West), the effects of reactive power will not be as bad as a system with all the solar panels facing North as the system is not reaching a single high peak power production in the middle of the day, so this may be a better option.
Reactive power will have the worst effect on solar power systems which have been oversized by over 133%. This means that the kW rating of the installed solar panels is more than 133% of the inverters rated kVA capacity, such as 7kW of solar panels on a 5kVA solar power inverter. A system such as this could be losing the 500W of power for a considerable part of each day, especially if all the solar panels are facing the same aspect..
Reactive Power and Solar Power Conclusion
As can be seen from the information above the new reactive power settings required by Energex will not really make much of a difference unless your solar power system has a solar panel array which is considerably oversized; say more than 6.5kW of solar panels on a 5kVA solar inverter and all the solar panels are facing the same way. If you do not fall into this category then you really don’t have anything to be concerned about, and rest assured that all the solar inverters recommended by Gold Coast Solar Power Solutions have reactive power as a standard feature.
Aero-Sharp inverters unfortunately are not being covered by the manufacturer for warranty faults, however if you have a fault code or error code on your Aero-Sharp inverter the following is a list of each fault code from the Aero-Sharp inverter manual.
Aero-Sharp Fault and Error Code Displays
Aero-Sharp fault codes are divided into two categories: CAT I faults and CAT II faults. When a CAT I fault occurs the inverter will stop operating while it can continue to operate when a CAT II fault occurs. The break down of the fault codes is as follows:
Aero-Sharp CAT I Fault Codes
When an Aero-Sharp inverter is displaying a CAT I fault only fault information, not operating information will be displayed. If the faults are more than one, the display will continually scroll between the faults every 5 seconds.
There are 5 types of CAT I fault as follows:Image may be NSFW. Clik here to view.
BIT Failure
Ground Fault
PV1 Over Volt
PV2 Over Volt
System Error
The system will stop operating upon occurence of the 3rd and 4th faults and will re-commence operation automatically upon disappearance of these faults. The system stops upon occurrence of the 1st, 2nd and/or 5th faults and will require manual repair to eliminate the fault condition.
Aero-Sharp CAT II Fault Codes
With CAT II fault codes on Aero-Sharp inverters there are two lines of information about the fault on the display. The upper line displays the fault information while the lower line displays information of the operating status and statistic information. If more than one fault is present the display will scroll between the faults with 5 second intervals.
There are five types of CAT II faults as follows;
PV Over Power
Grid Volt Error
Grid Freq. Error
TVS1 Failure
TVS2 Failure
When the 1st, 4th and / or 5th fault conditions occur the system will still operate normally while there will be advice when TVS1 or TVS2 need to be replaced. The system will stop operating upon occurrence of the 2nd and 3rd faults; it will however automatically reconnect when the grid is within the inverter specifications.
Image may be NSFW. Clik here to view.The lower line as mentioned above will display the operating status and statistic information as follows:
Vgrid: Value range 0 to 499, unit: V
Pout: Value range: 0 to 3999, unit: W
Vpv1: Value range: 0 to 499, unit: V
Vpv2: Value range: 0 to 499, unit: V
E-Today: Value range: 0.0 to 99.9, unit: kWh
E-Total: Value range: 0 to 300000, unit: kWh
T-Today: Value range: 0.0 to 24.0, unit: h
T-Total: Value range: 0 to 99999, unit: h
Internal Tmp: Value range: -100 to 100, unit: °C
Mode: used to indicate the operating mode the Aero-Sharp inverter is currently in.
If your Aero-Sharp solar inverter is faulty it can be repaired but usually there isn’t much point doing this when you consider how much it will cost. If you are on the Gold Coast or in Brisbane we can help get your solar power system operating again.
If you have CMS 2000 or CMS 1500 solar inverter that is displaying an error message or a red light check out the table below to find out what the message means. Unfortunately the manufacturer of these inverters are not honouring any warranties, so an error message may possibly mean you are up for some money to get your solar power system operational again. Click here for more information.
CMS 1500 and CMS 2000 Fault and Error Messages
Operating Message
Message in English
Description
System Fault & Error Messages
Isolation fault
Isolation failure
Earth fault on the solar panels or failure of surge protection
Ground I Fault
GFCI active
Leakage current to ground is too high
Grid fault
Grid failure
Grid measured data is beyond the specification (voltage & frequency)
No utility
No utility
Utility is not available
PV over voltage
Input voltage too high
Input voltage from the solar panels higher than the max input voltage
Inverter Fault and Error Messages
Consistent fault
Consistent failure
The readings of 2 microprocessors are not consistent. CPU and/or other circuit not functioning may be the cause.
Over temperature
Temperature too high
The internal temperature is higher than the normal value
Relay failure
Output relay failure
The relay between the inverter and grid is not functional
DC INJ High
Output DC injection too high
Output DC injection is too high
EEPROM failure
EEPROM problem
EEPROM inside the inverter has a data access problem
SCI failure
Problem with communication between microprocessors
The communication between MCU inside the inverer is abnormal
High DC Bus
DC bus voltage is too high
The DC Bus inside is higher than expected
Low DC Bus
DC bus voltage is too low
The DC bus inside is lower than expected
Ref 2.5V Fault
2.5V reference voltage inside problem
The 2.5V reference inside the inverter is abnormal
Is your Sunny Roo solar power inverter showing an Er-22 error code on the screen?
The Er-22 error code is telling you that the output relay inside the Sunny Roo inverter has failed. The course of action that the Sunny Roo inverter manual recommends to take for an Er-22 fault is to turn the inverter off and wait for the inverter LCD screen to go blank. When the LCD screen is blank, restart the inverter and see if the fault has cleared and if the system resumes operation.
Please see the following video on how to do this.
In our experience it is very rare that a Sunny Roo inverter does actually resume operation after being rebooted from an Er-22 fault as the output relay does not tend to fix itself! If you find that the Sunny Roo inverter continues to show the Er-22 fault after being rebooted you really only have 2 choices:
Get the inverter repaired
Replace the inverter with a quality replacement
Sunny Roo Er-22 Fault – Your Options
1. Repair the inverter. You may feel that this option would be the cheapest option to get your solar power system operational again however is tends to end up being quite expensive as you need to:
Pay to have an electrician disconnect the inverter
Pay to send the inverter to a reputable repair shop
Pay for the repairs
Pay to have the inverter returned to you
Pay to have an electrician reconnect the Sunny Roo inverter
All the above is not going to leave you any change from $500, and after all of that you still have an inverter that is of inferior quality with no warranty as the manufacturer has disappeared. Your best option may be the second option, 2. Replace the inverter with a quality replacement. A quality replacement inverter is the best way to go, yes it will cost a bit more up front but it will give you a reliable inverter and a warranty from a company that should be around to back it if it’s required in the future.
Quality Replacement Solar Power Inverters
At Gold Coast Solar Power Solutions we are really saddened to see the number of people that have been left with solar power systems that are not operational by Beyond Building and the Sunny Roo brand and others using inferior components. If you are one of these people with a solar power system that is not functioning due to a faulty inverter we can supply and install a quality replacement inverter for you as quickly as possible; we fully understand that a solar power system that is not operational is a liability rather than the asset it should be.
The old saying comes to mind, “Quality is remembered long after price is forgotten”
Is your Clenergy solar inverter displaying a red light and a Ground I Fault message on the screen?
Image may be NSFW. Clik here to view.At Gold Coast Solar Power Solutions we’ve seen a large number of Clenergy inverters displaying the Ground I Fault message, it can be displayed on all the Clenergy inverter models although the SPH15, SPH20 amd SPH30 models are the main ones that seem to have the issue around the Gold Coast and Brisbane areas. In each case according to the Clenergy solar inverter manual the Ground I Fault means Grid output ground leakage current too high. Now isn’t that helpful to know?! What it means in English is the Clenergy inverter has detected a fault whereby some of the power is being lost to earth, and as this is a major issue it shuts the inverter down for safety.
What can you do about a Clenergy Ground I Fault?
The first thing you can try is rebooting the system:
Turn OFF the Solar Supply Main Switch in the switchboard
Turn OFF the PV Array DC Isolator beside the inverter
Wait for the Clenergy inverter screen to go blank and then a few more seconds
Turn the PV Array DC Isolator beside the inverter back ON
Turn the Solar Supply Main Switch in the switchboard back ON
Wait for the inverter to reboot
See if the Ground I Fault has cleared
If the reboot has not cleared the Ground I Fault then it looks like you will require the assistance of a professional solar power accredited electrician. If you are on the Gold Coast or the South side of Brisbane then contact us here, otherwise contact your local solar power professional for further assistance.
Is your Clenergy solar inverter displaying a red light and a Relay Failure message on the screen?
Image may be NSFW. Clik here to view.At Gold Coast Solar Power Solutions we’ve seen a large number of Clenergy inverters displaying the Relay Failure fault message, it can be displayed on all the Clenergy inverter models although the SPH15, SPH20 and SPH30 models are the main ones that seem to have the issue around Gold Coast and Brisbane area. In each case according to the Clenergy solar inverter manual the Relay Failure means grid output relay failure. Now isn’t that helpful to know?! What it means in plain English is the Clenergy inverter has detected a fault with a relay inside the inverter; this is an electrical component inside the inverter that has developed an issue and is not allowing the system to produce any power.
What can you do about a Clenergy Relay Failure Fault?
The first thing you can try is rebooting the system:
Turn OFF the Solar Supply Main Switch in the switchboard
Turn OFF the PV Array DC Isolator beside the inverter
Wait for the Clenergy inverter screen to go blank and then a few more seconds
Turn the PV Array DC Isolator beside the inverter back ON
Turn the Solar Supply Main Switch in the switchboard back ON
Wait for the inverter to reboot
See if the Relay Failure fault has cleared
If the reboot has not cleared the Relay Failure then it looks like you will require the assistance of a professional solar power accredited electrician. If you are on the Gold Coast or the South side of Brisbane then contact us here, otherwise contact your local solar power professional for further assistance.